I want to share an issue I found while configuring Power Pages SharePoint Integration, drove me crazy, couldn’t find anything pointing me in the right direction and was only able to find out what the issue was thanks to a colleague asking a simple question that turned out to be the solution.
This was an instance where we configured SharePoint Integration for Power Pages in Dev, all working as expected. Folders from SharePoint showed up as expected on their related records.
When we deployed the portal to Live, where SharePoint Integration had already been active for a few years, the integration wasn’t working, and the Document Locations’ subgrid was showing an error:
“No list could be found with the relative URL listUrl. Ensure that document management has been enabled for the entity.”
After looking into the Live environment SharePoint settings it seemed that the Document Locations weren’t using the out of the box library that was created but a custom one. So instead of a new_entity, it was using a library called Entity.
We originally though this was it, since in dev we were using the out of the box library maybe there was some limitation where Power Pages only uses the logical name of the table when looking for the SharePoint library. We couldn’t find a lot on this and most people kept point us to “use library with entity logical name”.
Also, everything was working exactly as expected in Dataverse, SharePoint Integration worked correctly, clicking Open Location from a record opened the correct library and adding/removing documents worked from the Dataverse Documents tab.
But, like I said in the top of the post, while troubleshooting this, a colleague noticed that the Document Location relative URL in Dataverse was set to “entity”, but the library in SharePoint was called “Entity”, and yeah, this turned out to be it!
Document Locations relative URLs are case sensitive when using Power Pages SharePoint Integration!
Hopefully this helps someone out there and saves you a couple of days of headaches trying to find the issue.
This is a straightforward post, need to show an image column? Want for it to render in a nicer way and not just appear into existence after the portal downloads it? Here’s the bit of code you can use.
To add a Image Column to a Power Pages Web Page you just need to add this bit of code, in here I’m using a media card to display image + description on the right:
The thing with the image fields though, is that they take longer to load than the other resources on the page. It didn’t look great so I looked around for a way to make this a bit better.
The solution is to hide the component and fade it in when it’s loaded. So change the code above on the <img /> element to the following:
I’ve recently had a Power Pages implementation where we had to display a form with a lot of data and multiple tabs.
Since Web Forms render Dataverse forms as a single page, regardless of how many tabs it has, this turned my portal page into a never ending scroll hell! Customer asked if there was some way to work around this and turn the Dataverse tabs to clickable tabs in Power Pages as well.
Bootstrap v3.3.6 supports both Tabs and Pills, so the plan was to turn a form into something that used these components as Tab selectors.
Looking into how the forms are rendered it looked like it was possible, so, after searching for different approaches and mashing together a few resources, here’s what I came up with:
var ListedTabs = function(){
    // Find the parent element containing the form
    var formContainer = $("#EntityFormPanel").find("div:first")[0];

    // Create a new unordered list element
    var ul = document.createElement('ul');
    ul.role = "tablist";
    $(ul).addClass("nav nav-pills");

    // Find all the h2 and div elements within the form container
    var tabnames=[];
    var tabids=[];

    $('.tab-title').each(function() { tabnames.push($(this).text()); $(this).hide(); });
    $('.tab').each(function()
    {
        tabids.push($(this).attr("data-name"));
        $(this).addClass("tab-pane");
    });
    $('.tab').first().addClass("active");

    // Loop through the headings and contents to create tab navigation
    for (var i = 0; i < tabnames.length; i++) {
        // Create a new list item element
        var li = document.createElement('li');

        // Create a new anchor element for the tab link
        var a = document.createElement('a');
        a.href = '#tabs-' + (i + 1); // Set the href attribute
        a.role="tab";
        a.setAttribute("data-toggle","tab");
        a.textContent = tabnames[i];
        a.title = tabnames[i];
        if(i == 0)
            a.setAttribute("aria-expanded", "true");

        // Append the anchor element to the list item element
        li.appendChild(a);

        // Append the list item element to the unordered list
        ul.appendChild(li);

        // Add a class to the content div corresponding to the tab
        $("div[data-name=" + tabids[i] + "]").addClass('content');
        $("div[data-name=" + tabids[i] + "]").attr('id', 'tabs-' + (i + 1));
    }

    // Insert the unordered list before the first h2 element
    var firstHeading = formContainer.querySelector('h2');
    formContainer.insertBefore(ul, firstHeading);
    formContainer.insertBefore(document.createElement('br'), firstHeading);
    $(formContainer).addClass("tab-content");

    // Select first tab
    $("ul[role='tablist'] a:first").click();
};

$(document).ready(function () {
    ListedTabs();
});
Add this snippet to the JavaScript part of the Web Page that has the Web Form.
If all goes well the snippet will search for all headings that are supposed to have the Tab name and create a clickable list item for each of them.
Pills looked a lot better than tabs so that’s what I went with, but to use tabs we just need to change the nav-pills class to nav-tabs.
Also, keep in mind that if at any point the form rendering changes and the IDs or components are different the functionality might break, something to always keep in mind when we use this approach!
Here’s a quick one just to get me to add a post to the blog.
I ran into this issue recently, still not sure if this is just me, if I’m missing some sort of update (weird since I’m on the latest version of the portal), if something was removed on newer version or something else.
When moving to mobile view the Power Pages Lists are not adapting and turning into the mobile version. This has been happening for sometime now and I can’t find the reason for it, can’t find any documentation regarding this.
After some searching around and looking into other portals where this is working it seems that the generated table is missing the table-fluid class.
If you’re in the same place as me and need to fix the issue and exhausted your options here’s a quick JavaScript fix that you can use:
//Fix for the portal not using the table fluid class on grids
$('.entitylist').on("loaded", function () {
  $("div.table-responsive").each(function () { $(this).find('table').addClass('table-fluid') });
});
Works for both lists and subgrid lists on Forms. If I find out the issue to this I’ll probably just update this post.
So, this is a bit of an oldie, but still very useful to know in my opinion. I think that, with all the new people joining the Power Platform in the last few years and with Power Automate being the main “weapon of choice” for anything Workflow related, the good ol’ Workflow Engine might not be as wildly know or used anymore.
Don’t get me wrong, Power Automate brings massive improvements when it comes to Workflows, but there are a few use cases where a Real Time Workflow that executes within the Dataverse message transaction can be quite useful.
For example, if you have a validation that you want to use and display an error message to the end user and want that to run server side, so that even if the request is done through the API the validation runs.
“Why not use a Business Rule with Context set to Entity?” I can hear you ask already (and with good reason). While Business Rules work for traditional fields, for Lookups that won’t be possible. Plus if you have the need to have a custom validation that requires you write some code this is the way to go.
So I’ll leave here how to create a quick Real Time Workflow that validates a Lookup field and if it doesn’t have the expected value you show the end user an error.
Create a Real-time Workflow
To create a real-time workflow in Dataverse, follow these steps:
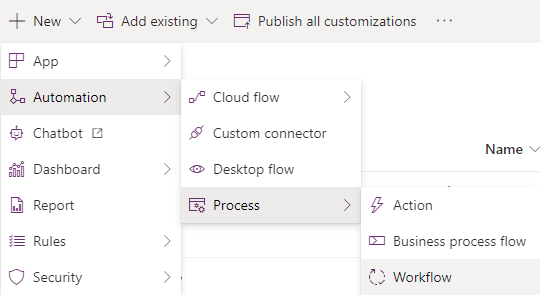
From the maker portal, navigate into your solution and click New – Automation – Process – Workflow.
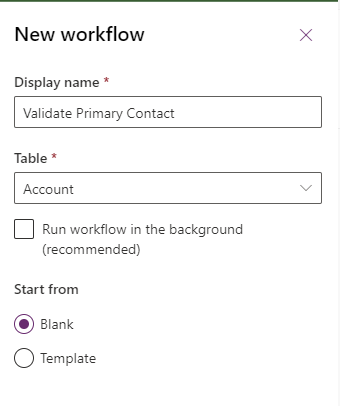
In the New Workflow window, enter a name for the workflow and make sure you untick the “Run workflow in the background” option. Hit create. Here’s what that looks like:
This will create the workflow and open up the classic editor in a new tab. This is where you’ll add your logic.
In this example we’ll just do a quick validation on the related contact record when the contact lookup is populated on the Account, and throw an error if that condition is true.
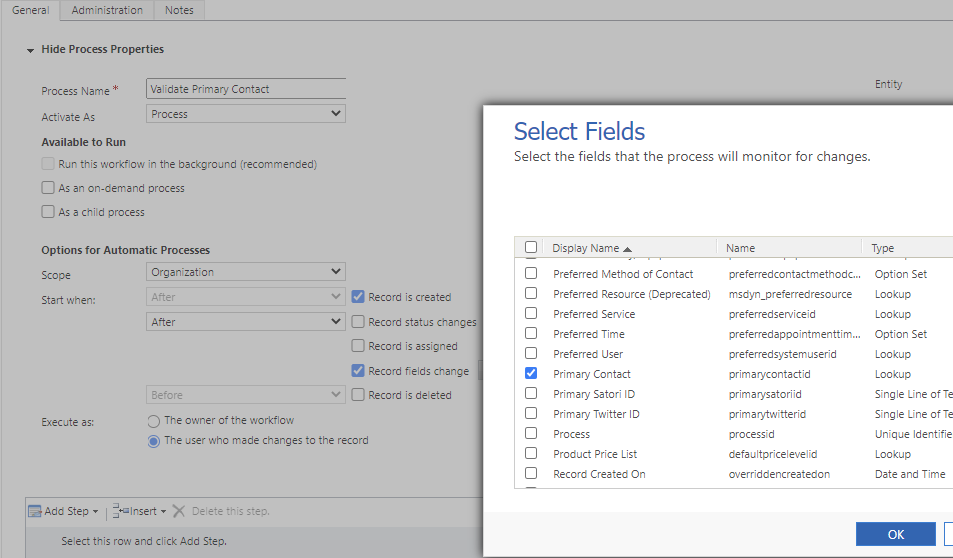
To do that, first set the trigger condition, in our case it’ll be create or update of the Contact Lookup field:
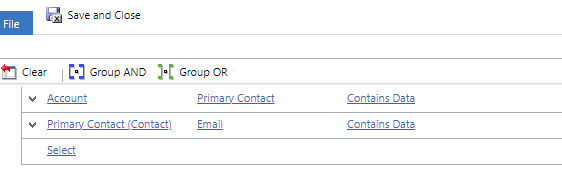
Next, we need our conditions. Select Add Step and “Check Condition”. We’ll then set the condition to be what we want it to be. Let’s say we want to force a contact with an email to be select:
If this is true then Successfully terminate the Workflow.
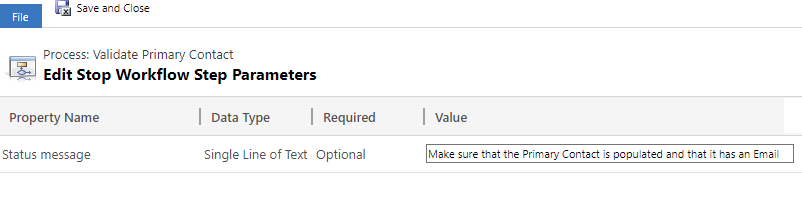
If not then Cancel the workflow and send a message to the user:
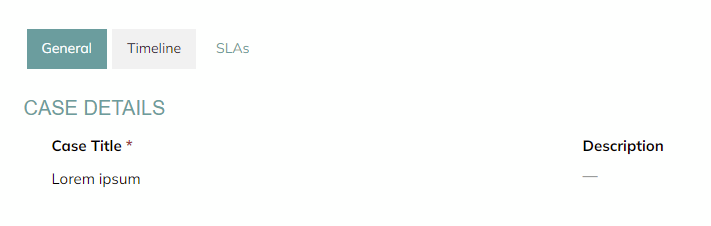
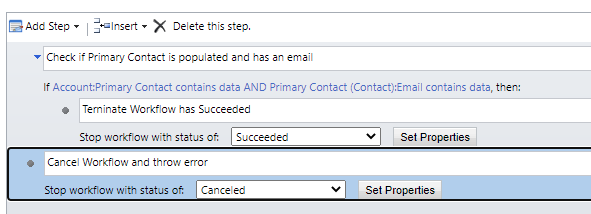
This is what our final Workflow should look like:
All that’s left to do is to Save and Activate the Workflow.
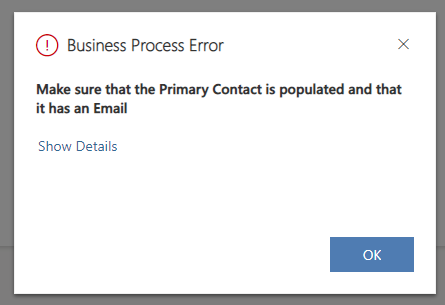
From now one, if you try to create a new Account the workflow will run and prevent you from doing it if the conditions aren’t met. Because it’s server side it doesn’t matter if it’s from the form or from the API:
Recently came across a requirement to automatically filter an Entity List when a filter is selected.
This was a List where all the filters are drop down boxes so it didn’t feel intuitive to choose an option and then have to click “Apply” for the Entity List to display the filtered results.
This is relatively straightforward and you just need to find the elements within the page and add an event to the on change of the dropdowns.
If you have a look at the source for the filters you’ll notice they’re numbered in a structured way with “dropdown_X” where X is the filter position:
So that’s easy enough, next we need to find a way to identify the button so we can trigger the click event. Again, just have a look at the source code:
No id but it does use a very identifiable class, “btn-entitylist-filter-submit”, so we can use that.
All that’s left is to create the code that iterates through all the filters and adds an event whenever an option is selected:
The above code first confirms that it can find a button with the same classes we identified before, if it does it loops a maximum of 10 times and sets a change event on the dropdown to trigger the click event of the button.
At the same time it also hides the button since we won’t be needing it anymore.
I’m limiting the amount of dropdowns to 10 but if for some reason you have more than 10 just change the for max loops from 10 to a higher number.
I’ve recently had to work with an embedded Power BI report on Power Pages (previously Power Portals), this is a report that has a few different sections that needs to be displayed depending on the page we’re in. Nothing too complicated.
What I did want to find out was how could I easily configure the Power BI Report in a dynamic way. This is for a couple of reasons, first, this application will eventually be deployed to a different environment, I don’t want to have to manually change URLs everywhere I’ve used the Power BI report. Even if I use a CICD pipeline I still have to add a few tasks to search for the URL string everywhere and replace it with the destination environment URL.
Which leads me to the second reason, I’ve started using the Power Platform CLI for Power Pages deployments and I want to use a deployment profile to manage the different settings and configurations between environments.
The solution? A mix of content snippets and a few well-placed liquid tags.
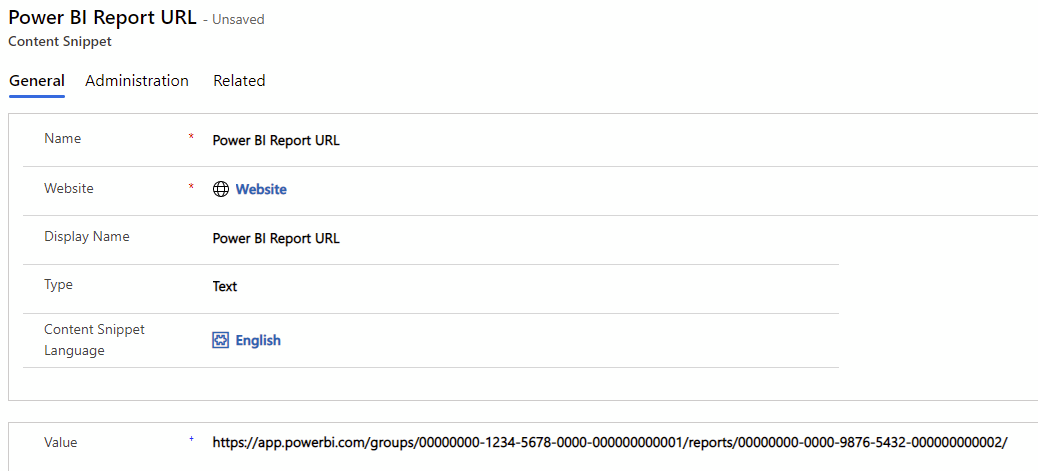
Configuring the Content Snippet
This is a simple one. Our end result needs to be a Power BI liquid tag, something that looks like this:
So we need to store the changing part or the URL on a content snippet. To do this just go into the content snippets and create a new one. Save it as Text and store the URL up to the ReportSection part. It should look like this:
Build URL using Liquid
Liquid can be a pain sometimes, especially if you can’t find the tags to do what you need to do.
The one we’re going to need to build our Report URL is the capture. This tag captures the content of its block and stores it in a variable.
So, for our scenario we’ll just capture the content snippet created above and any other Report Sections we want to display within that page, and store it in a variable called pbi_path. Then we’ll use that variable as the path for our Power BI Report.
That’s it. If you have any other Power BI reports just create another content snippet to ensure you have a single place where you can update its URL.
What about deploying to other environments?
Right, we now have a single place where we store our Power BI Report URL, but do I still have to go into my destination environment and update the content snippet every time I do a release? Nope!
If you are using the Power Platform CLI you can (and should!) take advantage of the deployment profiles when deploying your Power Pages application between multiple environments.
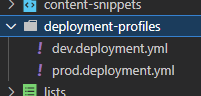
You can find more detail on deployment profiles here, but to keep it simple, on your VS Code project create a new folder called “deployment-profiles” and within it create two yaml files, one per environment, called “dev.deployment.yml” and “prod.deployment.yml”.
Within these we’ll define the records that we want to change per environment, in our case this is our “Power BI Report URL” content snippet. So open the dev.deployment.yml file and add the following:
adx_contentsnippet:
    - adx_contentsnippetid: 11111111-2222-3333-4444-555555555555 # Power BI Report
      adx_name: Power BI Report URL
      adx_value:  https://app.powerbi.com/groups/00000000-1234-5678-0000-000000000001/reports/00000000-0000-9876-5432-000000000002/
Note that you have to find your own adx_contentsnippetid that corresponds to the Power BI Report URL.
Then open your prod.deployment.yml and add the same thing but change the value to be the URL of the Production Power BI Report.
adx_contentsnippet:
    - adx_contentsnippetid: 11111111-2222-3333-4444-555555555555 # Power BI Report
      adx_name: Power BI Report URL
      adx_value:  https://app.powerbi.com/groups/11111111-2468-0000-0000-000000000001/reports/22222222-0000-9876-0000-123000321000/
That’s it! Just use the upload command while referencing the correct environment and you’re done!
Like many, I’ve always wondered about starting my own blog. I’ve been on the industry for quite a few years and always felt like I should start one so that I could give back to the community the same way I’ve received a lot from it.
So this is it, I’m finally giving it a go.
I’m not going to say this is something that comes natural to me, but I have no doubt this is something I definitely want to do. So bear with me as I learn how to share some of my knowledge and maybe help some of you along the way.